Advanced Tipster: How to Take Symmetrical Images with Exposing Both Sides of the Film (EBS)

64

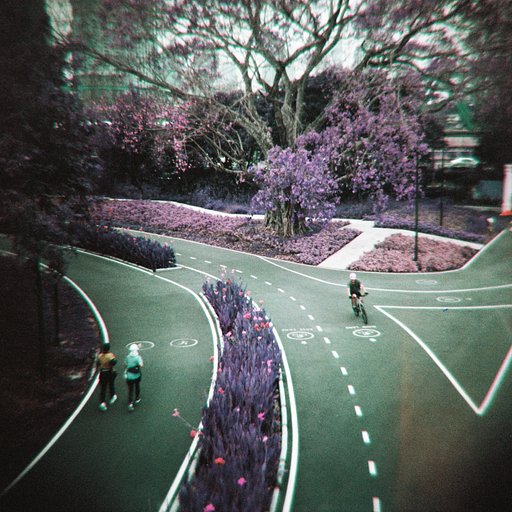
Today I will be introducing a technique called EBS ("Exposing Both Sides"). Is it hard to do? Maybe! But with luck and concentration, it is possible to achieve amazing results! For this tutorial, we will be using the Lomo LC-A+.

Credits: hodachrome

Loading the Film

1. Set the film for the first exposure and check if the film winder is winded fully. Make sure it's the same setting for the second time, too.
2. Pull the film end to the spool and mark the sprocket by the gear rolling up the film. By doing this, you can set almost the same for the second time.
3. Make sure that film is nicely stretched, or "tensioned". Use the rewind crank to make it straight.
4. Take a photo of how it sets by using a digital camera or your mobile phone camera so that you have a reference when doing these steps for the second time.
5. Close it, press the shutter, and wind. If you feel that the film is not quite winding, then reset the film again.

How to load the film

Shooting and Flipping the Film

1. Okay, now let's go out and shoot! Shoot on a day with clear weather and set the ISO as 400 or 200.
2. Shoot the regular side of negative film. I normally use 800 ISO, but I like to over-expose a bit since my LC-A+ gets a bit under-exposed when I use 800 ISO and set it as such.
3. Subject should be something quite high contrast with clear background. If you can include the blue sky in the background, it will look even better!
4. Use the Splitzer to cover the bottom half. The Splitzer is a Lomo LC-A+ accessory that lets you slice and dice the image. You may want to shoot a couple of the same shots, so that you can pick the best result out of it. If you don't have a Splitzer, follow this tip or use your finger!

5. When you are done shooting a roll, it's time to do the redscale technique; it is when the film is exposed from the wrong side, emitting a strong red color shift. To do this, go to a dark room to flip the film. Make sure to keep the film order. Be careful when doing this!
6. Once you flip the negative, it gets two stops darker, so it becomes ISO 200 redscale film from ISO 800 film. If you shoot 400, it will be 100 redscale film. If you shoot 200, it becomes 50, if you shoot 100, it becomes 25.
7. Make sure to set the film as exactly as the first time, otherwise, the result will not be symmetrical images!

Shooting with Redscale Film

1. Now, we're ready to start shooting with redscale! Pick a cloudy day, because redscale film yields better results and contrast on a cloudy day.
2. Set the ISO as 200.
3. Just like the first time, make sure to cover the bottom end by using a Splitzer. You are going to take a shot exactly in the same order, place, and angle -- yes, EXACTLY the same. How can we remember these details? I can't! I always jot down all the information when I shoot the first time. I try my best to take note of the order, location, composition and all the details. I even take photos of it using my mobile phone, too.

Do you need to hold the camera upside down? Nope, you already switched to the opposite side when you flipped the film from regular color negative side to redscale side in darkroom. So, you can shoot your camera normally, except if you were shooting vertically.

When you are done, bring it to the photo lab. It is a regular color negative, so you can simply develop with C-41. There is no need to indicate any special instructions. Since we exposed both sides, there might be some gaps of different lengths between each shot. If you are scanning it yourself, please be aware of it.

Did you get what you like? I hope you see the red and blue symmetric world :) It's a bit challenging, but it is great when you see good results! Try it out and enjoy your EBS life!


Just like hodachrome, you too can try his really awesome trick with the Lomo LC-A+. Drop by our online shop or one of our worldwide gallery stores to get yours!

2013-01-14 #gear #チュートリアル #redscale #multiple-exposure #tipster #double #double-exposure #ebs #exposing-both-sides-of-film hodachrome の記事

64 Comment

  1. blueskyandhardrock
    blueskyandhardrock ·

    great tipster. thank you!

  2. adi_totp
    adi_totp ·

    thanks! :D

  3. guitarleo
    guitarleo ·

    this is awesome.

  4. stouf
    stouf ·

    Truly amazing!

  5. icuresick
    icuresick ·

    great tipster @hodachrome

  6. pinkpix
    pinkpix ·

    This is really amazing!

  7. stratski
    stratski ·

    You are a photography god.

  8. mochilis
    mochilis ·

    WOW, amazing tipster, wonderfully explained!

  9. superlighter
    superlighter ·

    I wanna try it!

  10. trevorlau1
    trevorlau1 ·

    OMG! This is Fantastic! Thanks for Sharing!!

  11. kekskonstrukt
    kekskonstrukt ·

    wow, this is sooo cool!

  12. mafiosa
    mafiosa ·

    Amazing!

  13. lostlittlekid
    lostlittlekid ·

    Wow!

  14. djramsay
    djramsay ·

    very cool

  15. asharnanae
    asharnanae ·

    So cool, thankyou for sharing!

  16. istionojr
    istionojr ·

    love all of your ideas in this tipster Hoda, fantastic!

  17. juansupergen
    juansupergen ·

    Awesome

  18. bsdunek
    bsdunek ·

    Very clever!

  19. hodachrome
    hodachrome ·

    Thanks for reading and the comments!
    And thanks very much @whynotwinnipeg for translating!!

  20. twinklecat
    twinklecat ·

    Brilliant as usual, you guys! I just bought a Splitzer for the LC-A+, I can't wait to try this!

  21. gvelasco
    gvelasco ·

    This is fantastic. Really one of the most interesting techniques I've ever seen.

  22. moodyvamp
    moodyvamp ·

    wah... amazing... interesting...

  23. jeanne_d_arctique
    jeanne_d_arctique ·

    I am so going to try it!

  24. lupideeloop
    lupideeloop ·

    You need to have a great concentration to remember exactly the position in each scene (you really do it). Or maybe a help from a pocket digital cam.
    I love your pics. You've mastered your art pretty fine good!!!

  25. badjuju
    badjuju ·

    Thank you!

  26. paurizio
    paurizio ·

    this is the most impressive tipster I've ever read, thanks for sharing it!

  27. paurizio
    paurizio ·

    @hodachrome I just don't get a thing: after the film is reversed as you did in your tutorial, doesn't the order of the shoots revert itself? I mean, the lead of the film goes to the bottom. So the redscale shooting shouldn't be with an inverted order?
    I guess I made it more difficult than it is, damn! :D

  28. kmm
    kmm ·

    Awesome! I´ve gotta try this out :)

  29. clickiemcpete
    clickiemcpete ·

    I think you are the Official National Living Treasure of Lomographers! Amazing stuff as usual. :)

  30. olutek
    olutek ·

    Great tipster, I'll try it :3

  31. mojo_lomo
    mojo_lomo ·

    Brilliant idea! you are genius!

  32. sprofishgel
    sprofishgel ·

    Cool ! But the reverse or flip, as you called it, isn´t made as usual as I do the redscale. You have to take all the film out in the dark room and cut the end of it. And it´s the end that you glue in another capsule. Then you rewind it again. It´s the only way to have acess to the marks made in the beginning of the first layer, I think ! Awesome post man ;)

  33. raylemon
    raylemon ·

    amazing, thanks for the hardwork put into this tipster!

  34. deepfried_goodness
    deepfried_goodness ·

    One of the best tipster articles I've read in a while. I'll have to try this.

  35. djcosta
    djcosta ·

    amazing! Thanks for sharing.

  36. pangmark
    pangmark ·

    Great! .. and awesome photos

  37. hodachrome
    hodachrome ·

    @paurizio
    The order of shots doesn't revert, by means of my method of making redscale.
    It's just the way as Sprofishgel explained here. We need the darkroom or darkbox to do it.
    Maybe I should write another article about my way of making redscale film :)
    The link in this article "how to make a redscale film" is not my article so I have to admit that I haven't paid much attention to the concern of the "order". I 'll modify or add a postscript to this after I submit new article.
    @sprofishgel, I appreciate your supplementary explanation!

  38. paurizio
    paurizio ·

    well, the way @sprofishgel suggests surely works. Otherwise, following @hodachrome suggestion to make redscale I guess changing the roll twice might be the solution (just paying attention the lead of the film return in the original roll but in the opposite side it was at the very beginning)

  39. brandonwong
    brandonwong ·

    this is a wonderful technique!! thanks for sharing!!

  40. lukaaus
    lukaaus ·

    Wow! So beautiful. Crazy cool technique. I wanna try this.

  41. anamachado
    anamachado ·

    @hodachrome: THANK YOU SO MUCH.
    Already loved all your work, but explaining it to us is incredible nice of you!
    And I really wanted to know this!
    So, again, thanks so much for being you! :)

  42. niasarinastiti
    niasarinastiti ·

    this is awesome

  43. ridhostarr
    ridhostarr ·

    THIS IS BEYOND CREATIVITY OF A ANALOG USER! Proud to be an analog user! Great job by @hodachrome

  44. buckshot
    buckshot ·

    Thanks so much for sharing this very helpful article, @hodachrome. I got moderately successful results with your fantastic technique here: goo.gl/g1W20

  45. korppi
    korppi ·

    Great!! :)

  46. fredericdith
    fredericdith ·

    great job ! i translated it so the french community can enjoy it too :)

  47. eusonfeliz
    eusonfeliz ·

    wow thats hard

  48. palepony
    palepony ·

    this is tooooo gooood :)

  49. lomographer-88
    lomographer-88 ·

    I've been looking for this since a long time. Thanks your my saver :)

  50. catarinasalgado
    catarinasalgado ·

    dying to try it!

  51. hmarines
    hmarines ·

    @fredericdith Merci beaucoup! ;)

  52. crincle
    crincle ·

    That is so amazing, must be hard to get such wonderful results!

  53. sonjay
    sonjay ·

    This is wonderful, can't wait to try it out. Thanks for sharing!

  54. ihave2pillows
    ihave2pillows ·

    Awestruck ... !!!

  55. robertofiuza
    robertofiuza ·

    One of the most interesting techniques I have ever seen and love the care with which this tipster was made. I've tried this and got some prety nice results :)

  56. aguillem
    aguillem ·

    This way of making redscale could suit well too.
    www.lomography.jp/magazine/tipster/2013/08/03/red-o-lutiona…
    Especially because you can do it on the go, without a dark room. So no need to come back home before to shot the redscale side!
    In the comments @martadublin said that it worked with a LC-A+, but @clickiemcpete said that it doesn't with the LC-W...

  57. tempospeed
    tempospeed ·

    After you redscale the film, how do you load it with the leader being upside-down?

  58. antiox
    antiox ·

    @hodachrome AWESOME TIPSTER!!! Will definitely try this myself! :D

  59. freepeanuts
    freepeanuts ·

    GENIUS!!!

  60. mimifleuri
    mimifleuri ·

    Thanks for sharing your amazing technique!

  61. neja
    neja ·

    sounds super complicated :)))

  62. moerkrum
    moerkrum ·

    great tipster, have to try this!

  63. amaiahodge
    amaiahodge ·

    Wow!!!!

  64. antoniocastello
    antoniocastello ·

    nice work!!! looking forward to see some sun soon!

他の記事を読む